In this articles, Lyson Ober explains How to Transform Selfies into Professional Portraits & Create E-commerce Product Images with Magnific Relight.
My recent post about AI portraits / product photography / pet photography went viral, so today I’ll explain how it’s done, especially why my AI portrait photography can achieve such high fidelity. We’ll be using the latest Relight feature from magnific.ai. This product is a bit pricey, previously famous for its high-quality Upscale function, which also consumes Credits very quickly…
Generally, one Upscale costs at least 15 Credits. However, Style Transfer and the latest Relight feature only consume 5 Credits per use. Currently, I haven’t seen any open-source workflow integrating IC-Light that can achieve the effect of this commercial product. So today, let’s introduce the usage strategy:

Style Transfer is for transferring styles. For example, if you want to convert a selfie to a clay style, you can use this feature.
Relight, on the other hand, can transfer the light source environment and position based on Text Prompt, Image Reference, or Light Map without changing the image style. For instance, if you just want to change the light source of a photo without converting it to an anime style, then you choose Relight.
Additionally, changing the light source involves deciding whether to change the background. Sometimes, you just want to change the light source without altering the background; other times, you might want to change the background to match the expected light source environment.
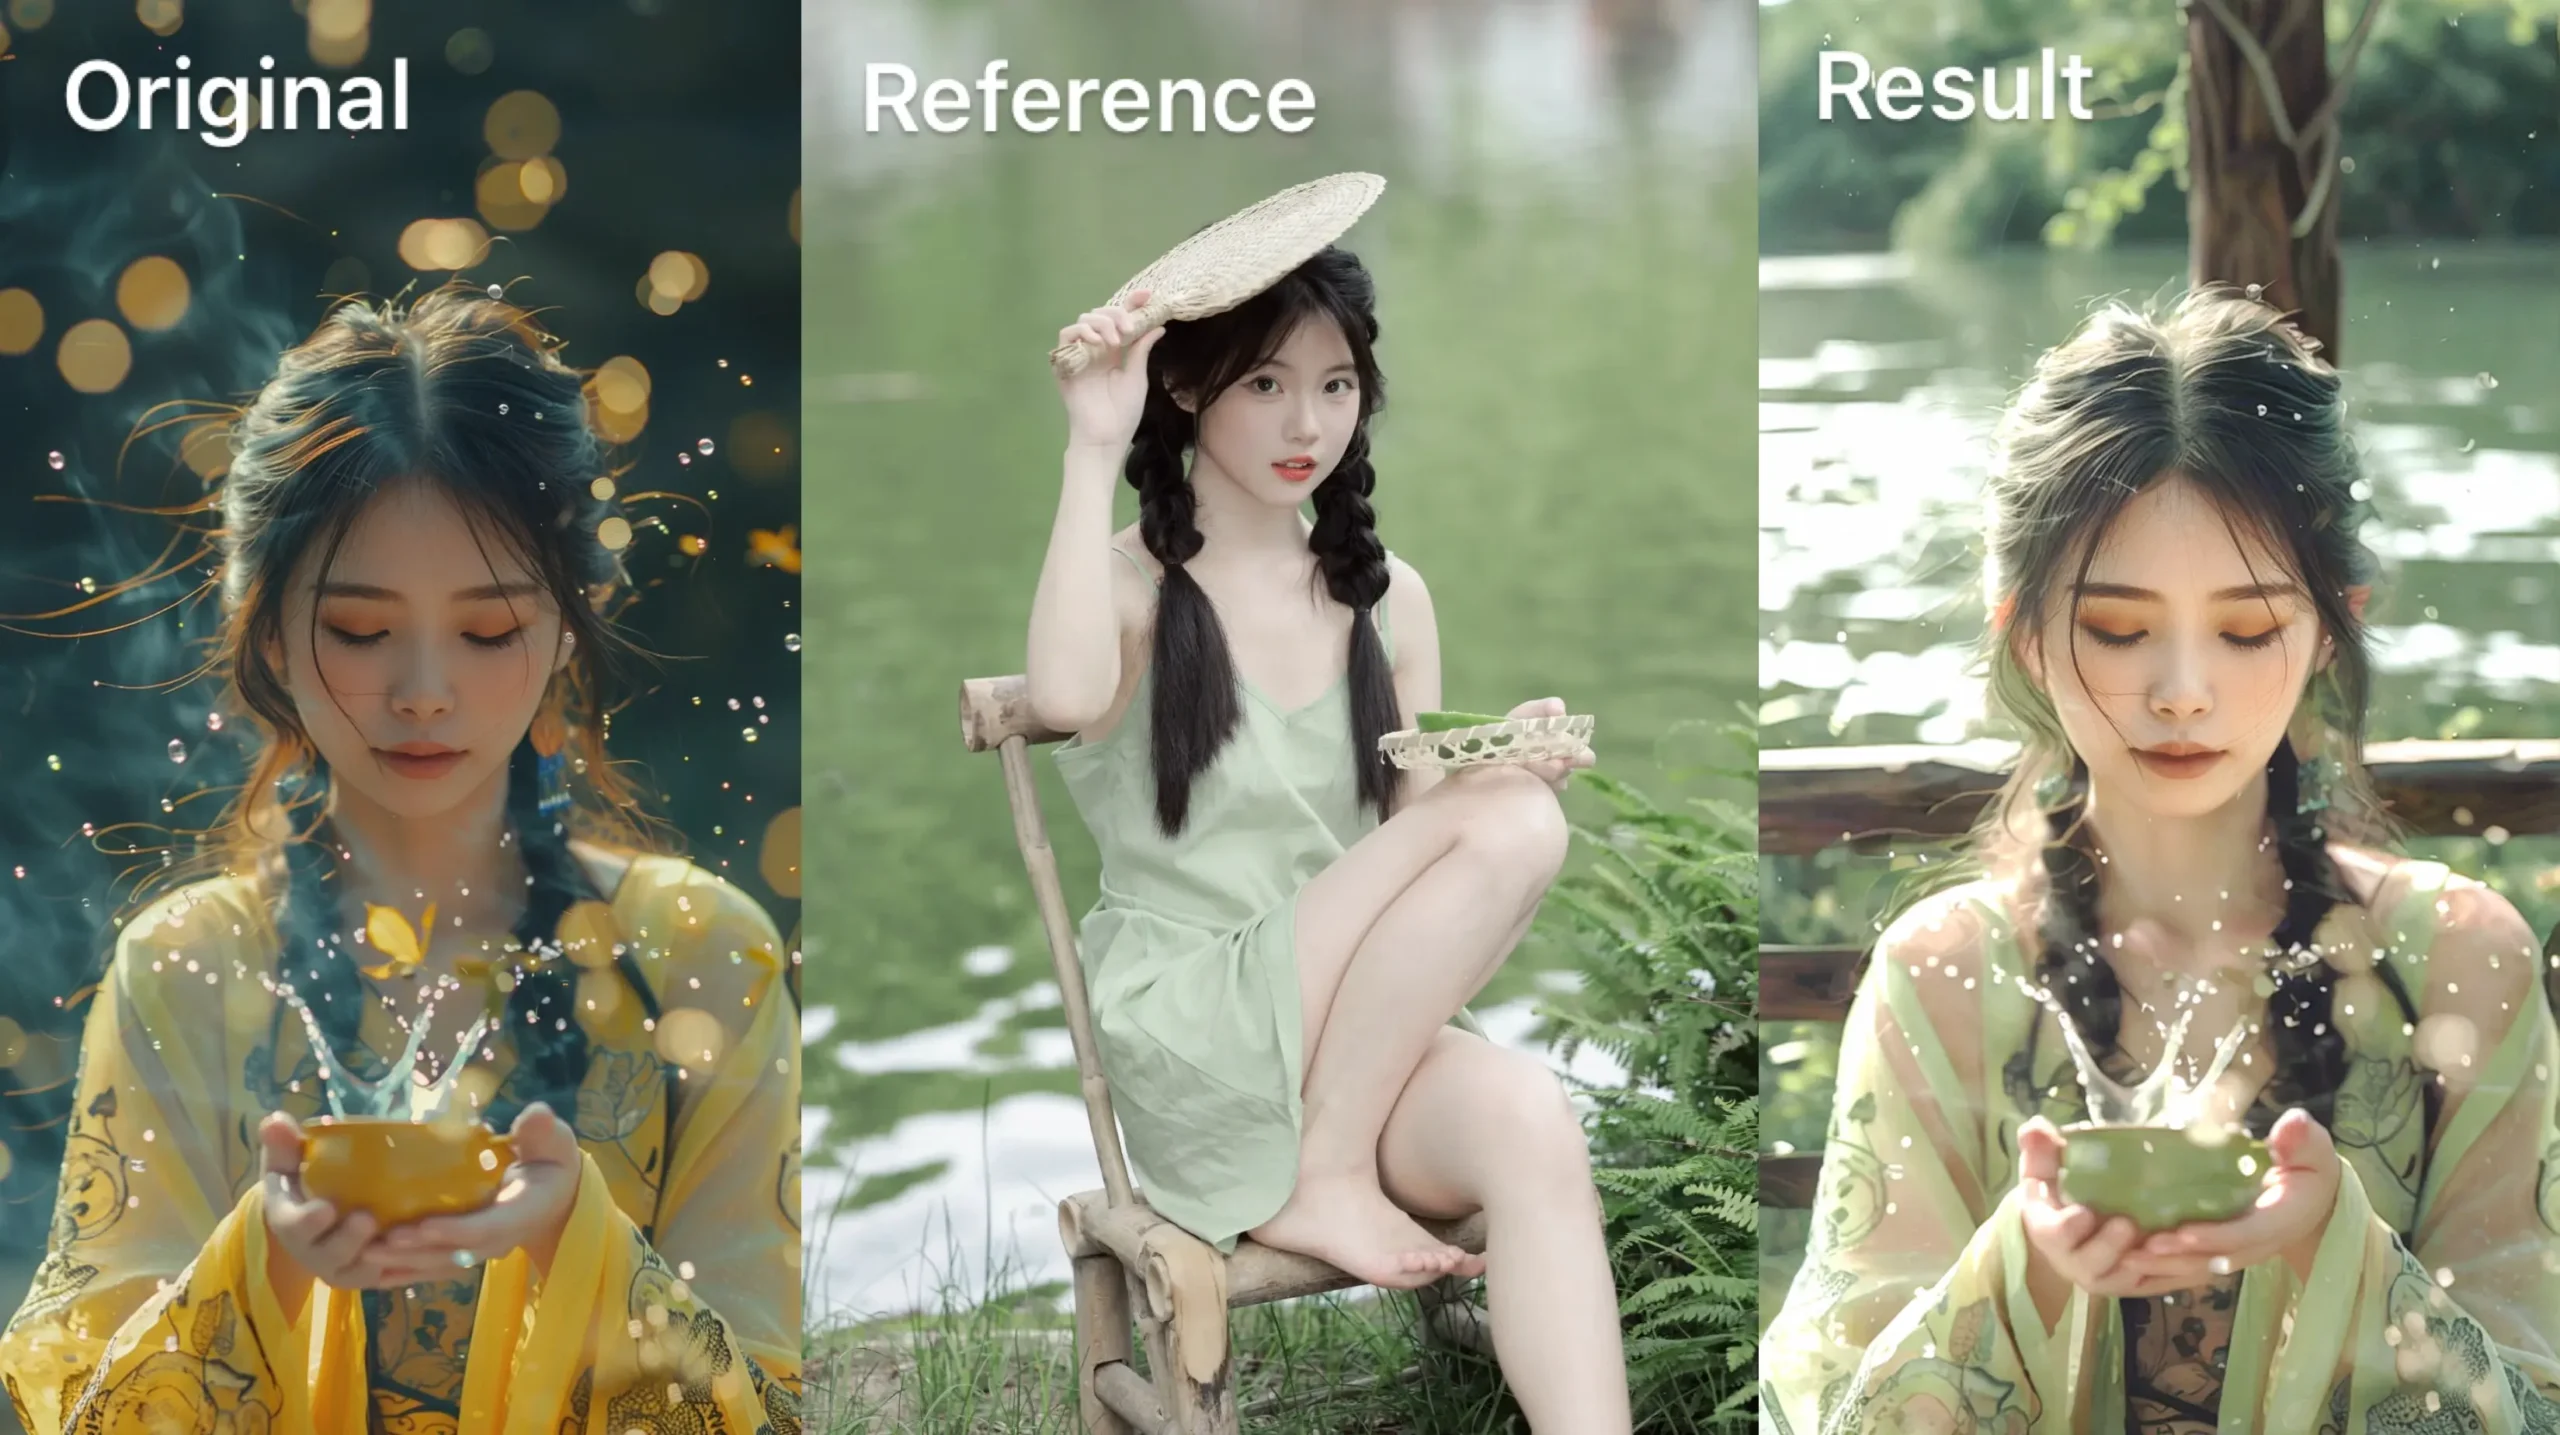
For example, see the image below:

This selfie transformed into an AI portrait photo uses the middle image as a light source reference, with the Change Background option checked. As for Light transfer strength, it controls the intensity of the transfer. In short, the lower the value, the less change in the original image’s light source environment; the higher the value, the closer it gets to the reference image’s environment.

Style refers to the image style, usually set to the default Standard. In fact, it’s hard to say which Style is more suitable for your case. Even if I make multiple images to compare styles, it may not be entirely consistent in your scenario. So I recommend you test according to your needs. For example, for the portrait image above, I guess using Darker but realistic might work better, so I plan to try it. Many people might prefer a “fresh and bright Japanese photography” style, and I guess using Brighter would work better. I won’t explain Interpolate from original in detail here. All parameters have a “question mark button” next to them; click it to expand detailed function explanations, which you can check yourself.
Finally, there’s Advanced settings. Be sure to try adjusting the parameters here. When expanded, you’ll find the top parameters are Whites, Blacks, Brightness, Contrast, Saturation. Sounds familiar, right? These are the basic exposure parameters in Lightroom, or Camera Raw in PS, or the photo editing software on your phone. For example, for a “fresh and bright Japanese photography” style, I usually reduce Contrast and increase Brightness a bit.
Regarding the adjustment of these parameters, I strongly recommend searching for videos like “basic photography post-processing parameter explanation” on YouTube or Bilibili to understand. Here, I mainly want to emphasize the Engine parameter. If you want the style to be more realistic, I recommend choosing Real. For example, for the photography portrait above; if you’re working on a comic image, I recommend using Illusio.

For instance, if you want to create comics today, how do you draw scenes? I recommend using Tripo3d.ai. On the surface, it’s a 3D model generation software, but in reality, it’s also a comic tool. How to understand this? Let’s say your comic scene is a castle. You might be limited by technique or time to draw materials from different angles. However, tripo3d.ai can generate 3D models in seconds through text prompt / single image. Next, you don’t even need to download the model; just rotate, zoom in, and out in the 3D preview window, then take screenshots directly.

This way, you get images of the same object from different angles. Then you can take the screenshots to Magnific and use Upscale to enlarge the pixels, details, and image quality, followed by Relight on the same image. Finally, you’ll get background images with beautiful backgrounds, consistent scenes, and consistent lighting. Of course, you can also switch the order of these two steps, Relight first, then Upscale.
However, in Advanced Settings, choose Illusio for the Engine. I’ve made a simple case here, see the image below.

Lastly, to put it simply, if you want to control “randomness”, remember to check Fixed Generation under Advanced Settings. This way, completely identical parameters will yield the same result. Light transfer A and B both control the intensity of light (according to the description). My personal understanding is that they control the position and intensity of the light source. I suggest you experiment and try more on your own, as different images will have different effects, and I can’t generalize.

Magnific Selfie to Portrait Case Analysis
After explaining the parameters, let’s talk about how we achieve high-precision replication in portrait photography and product photography cases. In fact, during experiments, I found that if the Light transfer strength value is too low (below 30%), the atmosphere and light source transfer effect might not be in place; conversely, if the value is too high, it might accidentally affect facial / e-commerce product details. How to achieve the best of both worlds? My solution is Magnific + PS. The whole process is very simple. Even if you’ve never used PS before, you can understand it at a glance. Read on below.

For very clear close-up photos, the Relight effect is quite good, and the direct output is completely usable. Now, let’s take an AI-generated portrait as an example:

Then you can go to RED (Xiaohongshu), INS, Catjourney to find a photo you like as a light source reference. For example, I found a photo taken by photographer Jane Hu (ID: janehu520520520) on RED, and I think her photography style is great.
If you like it, remember to follow her 👉 Profile
(The image has been authorized by the photographer for use in this tutorial)

Magnific Relight parameters are as follows:
- Light transfer strength: 85%
- Uncheck Interpolate from original
- Check Change background
- Style: Clean
- Advanced Settings:
- Whites: 55%
- Blacks: 45%
- Brightness: 55%
- Contrast: 48%
- Saturation: 52%
- Engine: Real
- Light transfer A: Automatic
- Light transfer B: Automatic
The result is as follows:

As you can see, the result is pretty good (in my opinion). However, if you want the facial features to be closer, the best way is to use PhotoShop to cut out the faces from the original image and the direct output image from Magnific.
The specific steps are as follows:
- First, put both images in.
- Select the original image layer, use the Pen tool (shortcut is P), use the mouse to circle around the face to enclose it, then press the shortcut Cmd + Enter to create a selection (blue line turns into black and white line, commonly known as marching ants). Then press Cmd + J to copy the current selection as a new layer, select it. Please note that this step doesn’t need to be very precise, but it’s always good to be as close as possible. So there’s not a huge workload, and I’ll explain why below.

Select this new layer, use PS’s Neural Filters → Harmonization → Use Magnific’s image as a reference layer → Adjust the reference strength and other parameters. The specific strength value here only needs to be adjusted according to your ideal situation.
For example, here I maxed out the reference strength and increased the brightness a bit.


Now, if you’re not satisfied with the facial light blending effect, you can click on the Magnific layer and press Cmd + J to cut out a layer with the same selection. Place it on top of all layers, then choose a suitable layer blending mode. Here, you don’t need to understand what the principle of each blending mode is.
Just hover your mouse over them as shown in the image below to see which blending effect is most satisfactory. After choosing, turn on/off the little eye button on the left side of the layer to compare. In this example, I won’t do this step because I think the effect of step 3 is already very good.
But later when we talk about the Trozk case, you might need to use this step. Especially in the Sspai case with the glowing display.

- Now let’s solve the issue of unblended edges from the cutout. In fact, there are countless ways to solve this problem, but I think with AI, the simplest method is to select a very narrow edge selection, then use PS generative fill. The advantage of this method is: the effect is very good, the learning cost is low, so even novices can get started.
- First, we use the Pen tool to draw a circle along the inner edge (quickly click-click-click, don’t worry about precision).
- Then, we still press Cmd + Enter to create a selection (get marching ants).

Then, we click Select menu in the window → Save Selection → Name it “contract”.
- Next, we click Select menu → Expand Selection → 15px (depending on your specific situation)
- Select → Load Selection → Subtract from Selection → This way we get a ring-shaped area. It’s equivalent to subtracting the small area from the large area, thus obtaining a ring-shaped area.
- If the size is not suitable, you can expand or reduce the range based on this ring-shaped area.
- Use AI Generative Fill, and it’s done
- Additional tip: In fact, mobile photo editing software has become a daily necessity for the public. So you can even use software like Hypic to modify parts of the face like the jawline, for better results!
- And in the following product case, you can also add effects like glow in the effects section.
- Or, if you’re a professional, I don’t need to say more, just use the shortcut Cmd + Shift + A in PS to open Camera Raw for further color adjustment or Cmd + Shift + X to open the Liquify tool.
- If you don’t know how to adjust colors, I still strongly recommend that everyone study the basic operations of simply adjusting hue, saturation, and brightness of each color, which will help you better restore colors.
- For example, in this case, I simply adjusted the exposure of the photo and the brightness of the green.

Magnific E-commerce Product Case Analysis
This part actually follows the same thought process as above. For example, let’s take the building block socket co-produced by Sspai and Trozk as an example.

Let’s demonstrate another one. First, prepare the original image, then I’ll go to Catjourney to find an image as an ambient light reference.
With Light transfer strength at 100%, the direct output effect is as follows. You can see that the environment and light source blend very well, but the product has indeed been deformed, which is absolutely unacceptable in the e-commerce field. However, the light source information of the “deformed product” in the image is indeed correct, don’t waste this information! Now we can blend it with the original image processed by Neural Filters through layer blending~ (Please recall the steps mentioned in the portrait photography section)

Finally, a little addition: if there are some flaws in the details after blending, you can select the layer above (magnific – main), then press the shortcut key e to use the eraser tool to erase unwanted parts. Also, keyboard shortcuts [ and ] represent decreasing and increasing the eraser size respectively. There are many methods for cutting out images. If you find it troublesome, Clipdrop’s automatic image cutout effect is pretty good: https://clipdrop.co/remove-background

Read related articles: